Instrukcja Train Driver 2 (dyżurny ruchu)/en: Różnice pomiędzy wersjami
(Utworzono nową stronę "== Introduction == The guide on this subpage contains all the most important aspects of the duty duty tasks in the game and has been reduced to a minimum, hence it is wo...") |
|||
| (Nie pokazano 23 wersji utworzonych przez 4 użytkowników) | |||
| Linia 3: | Linia 3: | ||
The guide on this subpage contains all the most important aspects of the duty duty tasks in the game and has been reduced to a minimum, hence it is worth reading it in full before starting the first duty to avoid problems during the game. | The guide on this subpage contains all the most important aspects of the duty duty tasks in the game and has been reduced to a minimum, hence it is worth reading it in full before starting the first duty to avoid problems during the game. | ||
| − | + | The train dispatcher has a huge impact on the course of the game, which is why this role is not recommended for beginners who have just started their adventure with the simulator. Before joining the game as a train dispatcher, it is worth getting familiar with the game in the driver mode and familiarize yourself with the basic rules of rail traffic management. Most of them can be found on our Wikipedia and in the documents Ir-1 and Ie-1 PKP PLK. | |
| − | == | + | ==Station selection== |
| − | + | The first important decision before starting the game as a train dispatcher is the choice of scenery. At the very beginning, it is better to avoid complicated, nodal, extensive stations with high bandwidth so as not to cause chaos and stop our virtual railway traffic. Novices will definitely find themselves at smaller stations: Cis, Glinnik, Hetmanice, Witonia and Zgierz Kontrewers. | |
| + | |||
| − | + | The stations marked in bold can be started from the game, after entering the dispatcher mode. Others can be found on the forum in the Sceneries section. The .sc file downloaded from the forum should be placed in the directory | |
| + | |||
| − | <code> | + | <code> C:\Users\[Nazwa użytkownika]\Dokumanty\OnRail Team\TrainDriver2\SavedStations</code> |
| − | + | On the example of the Hetmanice scenery, this is how will the path to the station.sc file look: | |
| − | <code> | + | <code> C:\Users\[Nazwa użytkownika]\Dokumanty\OnRail Team\TrainDriver2\SavedStations\Hetmanice\Hetmanice.sc</code> |
| − | + | If after selecting the duty mode in the game the scenery list is empty, it means that the "SavedStations" directory contains loose .sc files. In this case, just create a sub-directory for them with the name of the scenery and transfer the .sc files to them. | |
| − | == | + | ==Service== |
| − | + | Depending on the scenery, support for rail traffic control devices, it means switches and semaphores, is done using | |
| − | * | + | * styled for devices with Ebilock desktop '' 'SCS' '' |
| − | * | + | *domino panel using the "SPK" program |
| − | * | + | * mechanical devices located directly in the signal box in the game |
| − | + | Apart from them, '' '' SWDR4 '' ', whose operation has been thoroughly described [[Instructions_SWDR4 | here]], is an indispensable tool for duty work. | |
| − | ===SCS - | + | ===SCS - Simulation Control Center=== |
| − | + | The default desktop format for this program is the .scs extension. This program can be started from the launcher by selecting the SCS button or alternatively from the forum http://td2.info.pl/index.php/topic,100.0.html | |
| − | ===SPK - | + | === SPK - Cubes Desktop Simulator === |
| − | [[Plik:Widok ogólny pulpitu SPK.png|mały|centruj| | + | [[Plik:Widok ogólny pulpitu SPK.png|mały|centruj|Panel overview]] |
| − | + | The bell disactivation and the converter buttons are yet disactivated. | |
| − | + | All operations on the panel are executed by pushing (lpm) or pulling (ppm) the buttons for 2-3 seconds. | |
| − | + | <div class="mw-translate-fuzzy"> | |
| + | On this desktop there is no Automatic Route Setting: we set the route manually using the switch position change buttons (RMB - switch into 'minus' position, LMB - switch into 'plus' position) | ||
| + | </div> | ||
| − | + | Next we left-click the green button related to the proper signal and display a clearance signal. | |
| − | |||
| − | |||
| − | |||
| − | |||
[[Plik:Pulpit SPK 2.png|mały|centruj]] | [[Plik:Pulpit SPK 2.png|mały|centruj]] | ||
| Linia 56: | Linia 56: | ||
Przycisk Iz (czasami oznaczenie jako pJz) służy do zwalniania zajętości w przypadku gdy na zwrotnicy nie znajduje się tabor a zwarcie izolacji powoduje wykazywanie zajętości odcinka. | Przycisk Iz (czasami oznaczenie jako pJz) służy do zwalniania zajętości w przypadku gdy na zwrotnicy nie znajduje się tabor a zwarcie izolacji powoduje wykazywanie zajętości odcinka. | ||
| − | Ppm służy także do podania sygnału zastępczego na danym semaforze | + | Ppm służy także do podania sygnału zastępczego na danym semaforze za pomocą odpowiedniej kostki Sz. |
[[Plik:Pulpit SPK 3.png|mały|centruj|Pulpit z nastawianiem przebiegowym wygląda następująco. ]] | [[Plik:Pulpit SPK 3.png|mały|centruj|Pulpit z nastawianiem przebiegowym wygląda następująco. ]] | ||
Aktualna wersja na dzień 15:51, 5 sty 2023
Spis treści
Introduction
The guide on this subpage contains all the most important aspects of the duty duty tasks in the game and has been reduced to a minimum, hence it is worth reading it in full before starting the first duty to avoid problems during the game.
The train dispatcher has a huge impact on the course of the game, which is why this role is not recommended for beginners who have just started their adventure with the simulator. Before joining the game as a train dispatcher, it is worth getting familiar with the game in the driver mode and familiarize yourself with the basic rules of rail traffic management. Most of them can be found on our Wikipedia and in the documents Ir-1 and Ie-1 PKP PLK.
Station selection
The first important decision before starting the game as a train dispatcher is the choice of scenery. At the very beginning, it is better to avoid complicated, nodal, extensive stations with high bandwidth so as not to cause chaos and stop our virtual railway traffic. Novices will definitely find themselves at smaller stations: Cis, Glinnik, Hetmanice, Witonia and Zgierz Kontrewers.
The stations marked in bold can be started from the game, after entering the dispatcher mode. Others can be found on the forum in the Sceneries section. The .sc file downloaded from the forum should be placed in the directory
C:\Users\[Nazwa użytkownika]\Dokumanty\OnRail Team\TrainDriver2\SavedStations
On the example of the Hetmanice scenery, this is how will the path to the station.sc file look:
C:\Users\[Nazwa użytkownika]\Dokumanty\OnRail Team\TrainDriver2\SavedStations\Hetmanice\Hetmanice.sc
If after selecting the duty mode in the game the scenery list is empty, it means that the "SavedStations" directory contains loose .sc files. In this case, just create a sub-directory for them with the name of the scenery and transfer the .sc files to them.
Service
Depending on the scenery, support for rail traffic control devices, it means switches and semaphores, is done using
- styled for devices with Ebilock desktop 'SCS'
- domino panel using the "SPK" program
- mechanical devices located directly in the signal box in the game
Apart from them, SWDR4 ', whose operation has been thoroughly described here, is an indispensable tool for duty work.
SCS - Simulation Control Center
The default desktop format for this program is the .scs extension. This program can be started from the launcher by selecting the SCS button or alternatively from the forum http://td2.info.pl/index.php/topic,100.0.html
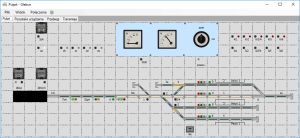
SPK - Cubes Desktop Simulator
The bell disactivation and the converter buttons are yet disactivated.
All operations on the panel are executed by pushing (lpm) or pulling (ppm) the buttons for 2-3 seconds.
On this desktop there is no Automatic Route Setting: we set the route manually using the switch position change buttons (RMB - switch into 'minus' position, LMB - switch into 'plus' position)
Next we left-click the green button related to the proper signal and display a clearance signal.
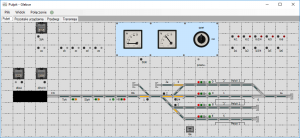
W celu doraźnego (awaryjnego) rozwiązania drogi przebiegu należy użyć ppm na przycisku “za” (zwolnienie doraźne przebiegu spod semafora A, dla semafora B będzie to zb dla semafora E2 będzie to ze2 itd.). W przypadku przebiegów manewrowych zwolnienie doraźne przebiegu spod np Tm2 będzie oznaczone jako ztm2. W niektórych przypadkach pod jednym przyciskiem zgrupowano zwalnianie doraźne spod kilku semaforów lub kilku tarcz manewrowych. Zwolnienia dokonujemy używając ppm.
Przyciski Kr służą do kasowania rozprucia zwrotnicy (gdy tabor jadąc z ostrza swoim naciskiem przestawia zwrotnicę).
Przycisk Iz (czasami oznaczenie jako pJz) służy do zwalniania zajętości w przypadku gdy na zwrotnicy nie znajduje się tabor a zwarcie izolacji powoduje wykazywanie zajętości odcinka.
Ppm służy także do podania sygnału zastępczego na danym semaforze za pomocą odpowiedniej kostki Sz.
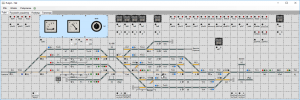
Ten pulpit charakteryzuje się funkcjami (zaznaczone na zielono od lewej):
- nastawianie przebiegowe
- grupa wybierająca sterowanie
- grupa wybierająca stan
W tym przypadku podawanie przebiegów pociągowych, jak też manewrowych odbywa się następująco:
Przebiegi pociągowe i manewrowe można podawać klikając punkt początkowy przebiegu (Tm21) i punkt końcowy (1b). W tym przypadku pulpit sam ustawi całkowitą drogę przebiegu (uwzględniając jazdę manewrową przez semafor E).
Puste miejsca na pulpicie (czarne pola) zostały przeznaczone na blokadę liniowa między sceneriami. Zostaną one wykorzystane w niedalekiej przyszłości.
Urządzenia mechaniczne
Na urządzeniach mechanicznych dźwignie dzieli się na 3 rodzaje, czerwone (semafory), niebieskie (rozjazdy) oraz niebieskie z czerwonym pasem (sygnalizacja manewrowa oraz wykolejnice). Obok dźwigni znajduje się aparat blokowy służący do utwierdzania przebiegów. Przy realizacji przebiegów manewrowych oraz pociągowych zawsze się układa drogę od tyłu. Aby ustawić przebieg na urządzeniach mechanicznych, ISEDR wpierw musi ułożyć droge dla pociągu poprzez ustawienie potrzebnych dźwigni w położenie "-" (dół) lub "+" (góra). Rozjazdy, które są potrzebne do utwierdzenia danego przebiegu, można znaleźć na tabliczce przy drążku przebiegowym. Po ułożeniu drogi, ISEDR musi zablokować rozjazdy przekładając drążek przebiegowy (drążek przebiegowy będzie zablokowany jeśli droga będzie źle ułożona). Po przełożeniu drążka przebiegowego można utwierdzić przebieg wciskając klawisz utwierdzający znajdujący sie nad aparatem blokowym. Oczko znajdujące się pod klawiszem utwierdzającym zmieni się z koloru czerwonego na biały, oznacza to, że przebieg jest utwierdzony i ISEDR może podać semafor. W przypadku gdyby dany pociąg nie zwolnił przebiegu ISEDR musi podejść so aparatu blokowego, następnie wcisnąć klawisz utwierdzający i trzymać go do momentu aż w oczku pojawi się kolor czerwony. Aby zmienić położenie danej dźwigni ISEDR musi do niej podejść i gdy łapka na powiększy się trzeba kliknąć i trzymać. Dźwignia rozpocznie zmiane położenia. Na urządzeniach mechanicznych występują także zamki eletro-magnetyczne. Takie zamki stosowane są do sterowania rozjazdami/wykolejnicami z napędami elektrycznymi.
Komendy i chat
Listę komend dostępnych w czacie w trybie dyżurnego można znaleźć tutaj.


