Zabudowa i konfigurowanie wpisów wykolejnic/en: Różnice pomiędzy wersjami
(Utworzono nową stronę "Installation and configuration of derailer entries") |
(Utworzono nową stronę "The installation of a derailer coupled with a turnout requires the derailer ID to be entered in the appropriate turnout window. 200px|thumb|center </ce...") |
||
| (Nie pokazano 25 pośrednich wersji utworzonych przez tego samego użytkownika) | |||
| Linia 5: | Linia 5: | ||
<br> | <br> | ||
| − | == | + | == Installation of derailers on the scenery == |
<center> | <center> | ||
| − | + | In order to install the derailer correctly, a 1.5 m long section of track should be set aside at the point of attachment. This will allow for the correct adjustment of the distance between the sleepers to match the derailer attachments (Pic. 1). | |
{| class="wikitable" style="margin-left: auto; margin-right: auto; border: none;" | {| class="wikitable" style="margin-left: auto; margin-right: auto; border: none;" | ||
! [[Image:Wk1a.jpg|800px]] | ! [[Image:Wk1a.jpg|800px]] | ||
|- | |- | ||
| − | | style="text-align:center" | | + | | style="text-align:center" | Pic. 1 Separation of a section of track for building a Derailer. |
|} | |} | ||
| − | + | The adjacent for the distance between sleepers should be set to 0.75 (Pic. 2). | |
{| class="wikitable" style="margin-left: auto; margin-right: auto; border: none;" | {| class="wikitable" style="margin-left: auto; margin-right: auto; border: none;" | ||
! [[Image:Wk2.jpg|250px]] | ! [[Image:Wk2.jpg|250px]] | ||
| - | | - | ||
| − | | style="text-align:center" | | + | | style="text-align:center" | Pic. 2. Sleeper spacing parameter. |
|} | |} | ||
| − | + | Of course, remember to use wooden sleepers (preferably beam sleepers) in this section of track. | |
| − | + | Select the appropriate derailer for the track prepared in this way. We have derailers that derail to the right (_r in the name) and to the left (_l in the name) at our disposal. In addition, each derailer has three typs of wear, the extreme ones being described as _new and _old. In order to install a double derailer, you must also use a prefab with the _belka_ in its name. | |
| − | + | Derailment lanterns come in two wear grades, and their installation will be discussed later. | |
| − | + | To install a single derailer, we need a proper prebuild derailer (here you can also select the type of drive and its position relative to the derailing plate). The situation described is illustrated in Pic. 3. | |
| Linia 36: | Linia 36: | ||
! [[Image:Wk3.jpg|800px]] | ! [[Image:Wk3.jpg|800px]] | ||
|- | |- | ||
| − | | style="text-align:center" | | + | | style="text-align:center" | Pic. 3 Left-hand derailment with drive on the left. |
|} | |} | ||
| − | + | The track structure on concrete sleepers is illustrated in Pic. 4. | |
{| class="wikitable" style="margin-left: auto; margin-right: auto; border: none;" | {| class="wikitable" style="margin-left: auto; margin-right: auto; border: none;" | ||
! [[Image:Wk4.jpg|800px]] | ! [[Image:Wk4.jpg|800px]] | ||
|- | |- | ||
| − | | style="text-align:center" | | + | | style="text-align:center" | Pic. 4. Derailer installation on a track with concrete sleepers. |
|} | |} | ||
| − | + | The correct installation of the derailer relative to the sleepers will be possible by entering the value 0.73 in the derailer window, specifically in the window for moveing the object along the axis of the track (Pic. 5). | |
{| class="wikitable" style="margin-left: auto; margin-right: auto; border: none;" | {| class="wikitable" style="margin-left: auto; margin-right: auto; border: none;" | ||
! [[Image:Wk5.jpg|800px]] | ! [[Image:Wk5.jpg|800px]] | ||
|- | |- | ||
| − | | style="text-align:center" | | + | | style="text-align:center" | Pic. 5. Parameter of correct location of the derailer relative to the sleepers. |
|} | |} | ||
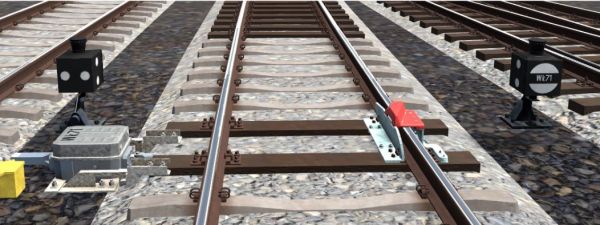
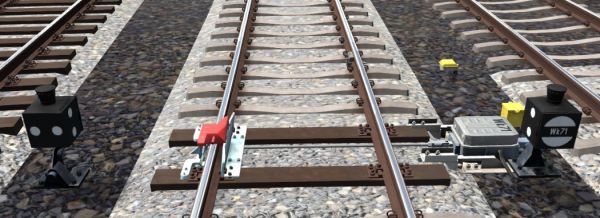
| − | + | In the case of a derailer whose drive is not coupled with the switch drive, two lanterns should be used. On the right-hand side when traveling in the direction of the derailment, we install a lantern showing two white semicircles separated by a black stripe, on which the name of the derailer is displayed. On the left side, we install a lantern showing two white horizontally arranged circles. The same image on the right and left lanterns can be seen from the other side of the derailer. | |
| − | + | The situation described is illustrated in Pic. 6 and Pic. 7. | |
{| class="wikitable" style="margin-left: auto; margin-right: auto; border: none;" | {| class="wikitable" style="margin-left: auto; margin-right: auto; border: none;" | ||
! [[Image:Wk6.jpg|600px]] || [[Image:Wk7.jpg|600px]] | ! [[Image:Wk6.jpg|600px]] || [[Image:Wk7.jpg|600px]] | ||
|- | |- | ||
| − | | style="text-align:center" | | + | | style="text-align:center" | Pic. 6. Installation of lanterns for uncoupled derailers (front view). || style="text-align: center;" | Pic. 7. Installation of lanterns for uncoupled derailers (rear view). |
|} | |} | ||
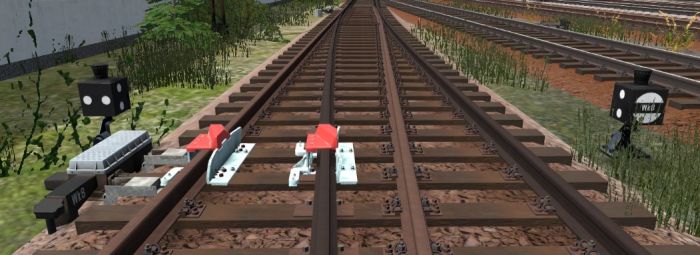
| − | + | The installation of a double derailer requires the use of a prefabricated derailer and a prefabricated derailer _belka_. Both prefabricated elements are named identically to ensure the correct operation of the double derailer (enter the same derailer name in the upper window for each prefabricated element). Pic. 8 shows the installation of a double derailer on the left, uncoupled with another drive. | |
{| class="wikitable" style="margin-left: auto; margin-right: auto; border: none;" | {| class="wikitable" style="margin-left: auto; margin-right: auto; border: none;" | ||
! [[Image:Wk8.jpg|700px]] | ! [[Image:Wk8.jpg|700px]] | ||
|- | |- | ||
| − | | style="text-align:center" | | + | | style="text-align:center" | Pic. 8. Structure of the left double derailer. |
|} | |} | ||
</center> | </center> | ||
| − | == | + | == Logical connection of derailers and turnouts == |
<center> | <center> | ||
| − | + | To logically connect all components of the derailer, enter the same identifier in each of them in the field marked with the symbol [[Plik:Wk9.jpg|200px|thumb|center]] | |
| − | + | Additionally, in the field marked, enter the markings as shown in the screenshot, which are displayed on the derailer elements. [[Plik:Wk10.jpg|200px|thumb|center]] | |
| − | |||
| − | + | The installation of a derailer coupled with a turnout requires the derailer ID to be entered in the appropriate turnout window. | |
| − | + | [[Plik:Wk11.jpg|200px|thumb|center]] | |
</center> | </center> | ||
| − | + | Prepared by: | |
[https://td2.info.pl/profile/?u=1641 trichlor] | [https://td2.info.pl/profile/?u=1641 trichlor] | ||
Aktualna wersja na dzień 07:21, 3 paź 2025
Spis treści
Installation of derailers on the scenery
In order to install the derailer correctly, a 1.5 m long section of track should be set aside at the point of attachment. This will allow for the correct adjustment of the distance between the sleepers to match the derailer attachments (Pic. 1).
|
|---|
| Pic. 1 Separation of a section of track for building a Derailer. |
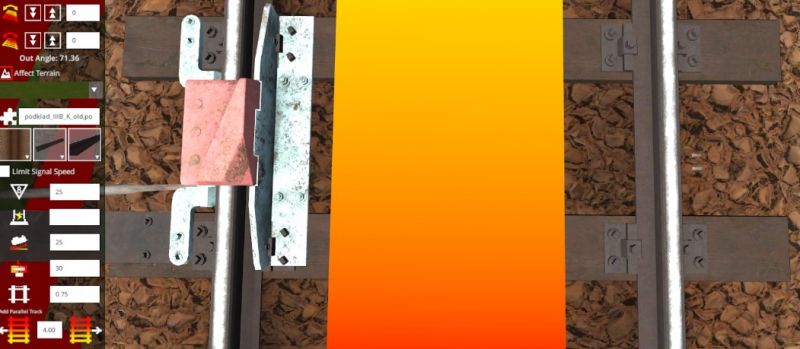
The adjacent for the distance between sleepers should be set to 0.75 (Pic. 2).

|
- | Pic. 2. Sleeper spacing parameter. |
|---|
Of course, remember to use wooden sleepers (preferably beam sleepers) in this section of track.
Select the appropriate derailer for the track prepared in this way. We have derailers that derail to the right (_r in the name) and to the left (_l in the name) at our disposal. In addition, each derailer has three typs of wear, the extreme ones being described as _new and _old. In order to install a double derailer, you must also use a prefab with the _belka_ in its name.
Derailment lanterns come in two wear grades, and their installation will be discussed later.
To install a single derailer, we need a proper prebuild derailer (here you can also select the type of drive and its position relative to the derailing plate). The situation described is illustrated in Pic. 3.
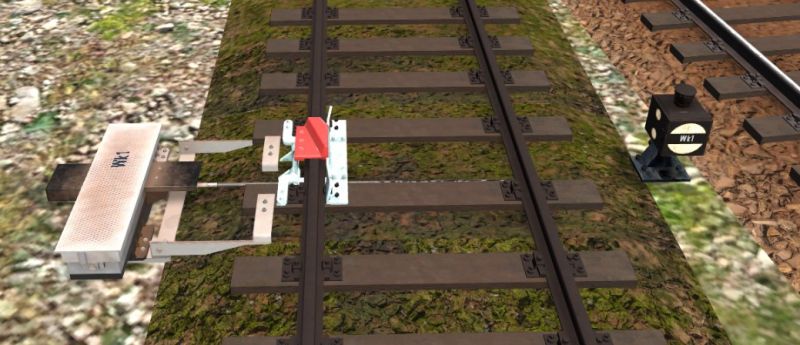
|
|---|
| Pic. 3 Left-hand derailment with drive on the left. |
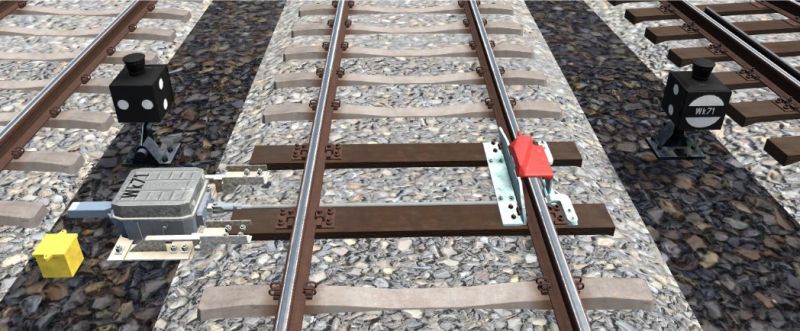
The track structure on concrete sleepers is illustrated in Pic. 4.
|
|---|
| Pic. 4. Derailer installation on a track with concrete sleepers. |
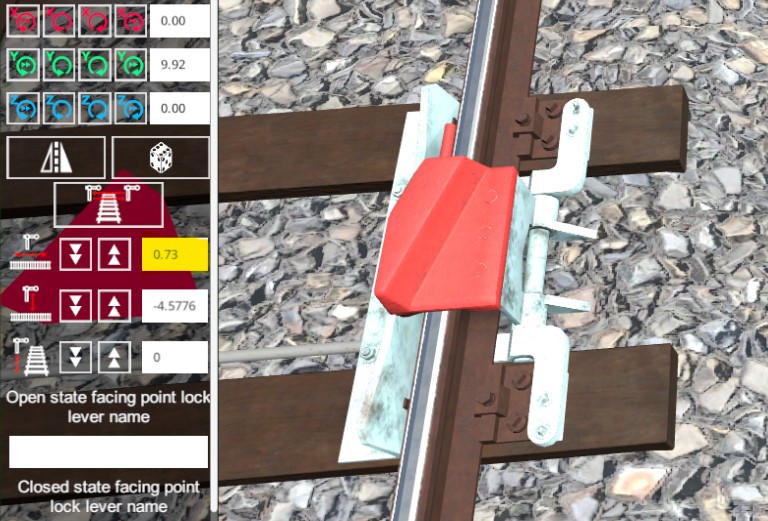
The correct installation of the derailer relative to the sleepers will be possible by entering the value 0.73 in the derailer window, specifically in the window for moveing the object along the axis of the track (Pic. 5).
|
|---|
| Pic. 5. Parameter of correct location of the derailer relative to the sleepers. |
In the case of a derailer whose drive is not coupled with the switch drive, two lanterns should be used. On the right-hand side when traveling in the direction of the derailment, we install a lantern showing two white semicircles separated by a black stripe, on which the name of the derailer is displayed. On the left side, we install a lantern showing two white horizontally arranged circles. The same image on the right and left lanterns can be seen from the other side of the derailer. The situation described is illustrated in Pic. 6 and Pic. 7.
 |
|
|---|---|
| Pic. 6. Installation of lanterns for uncoupled derailers (front view). | Pic. 7. Installation of lanterns for uncoupled derailers (rear view). |
The installation of a double derailer requires the use of a prefabricated derailer and a prefabricated derailer _belka_. Both prefabricated elements are named identically to ensure the correct operation of the double derailer (enter the same derailer name in the upper window for each prefabricated element). Pic. 8 shows the installation of a double derailer on the left, uncoupled with another drive.
|
|---|
| Pic. 8. Structure of the left double derailer. |
Logical connection of derailers and turnouts
The installation of a derailer coupled with a turnout requires the derailer ID to be entered in the appropriate turnout window.
Prepared by: trichlor
