DispatcherHelpEn
The Dispatcher has Driver clients connect to their station, which they then need to route through the station correctly and with minimal delays. Below are the things you need to know about playing as a Dispatcher:
Spis treści
The Important Parts
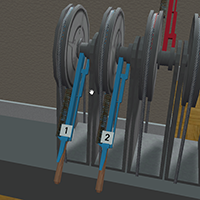
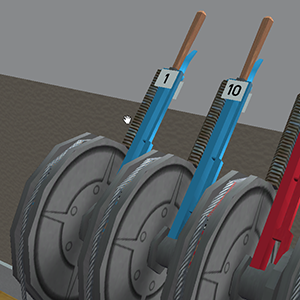 Switch Levers
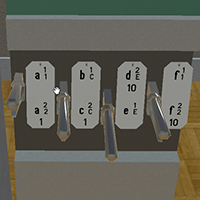
== Switch Levers ==Use these blue levers to control the direction of switches. To pull them down (and push back up), simply left-click and hold until you hear it ‘clunk’ into place. If they are in the ‘Up’ position, trains will go straight through the switch. In the ‘Down’ position, trains will turn.- == Route Selectors ==These are used to select paths for trains to go through your station. The big letters on the left are the beginning signal for that segment of the route. Beside them are two numbers or letters: the upper number beside each indicates if the route has a speed limit (1 for no speed limit, 2 for a speed limit) due to going through switches. Directly below this, there may be a number, letter or name. A number indicates the track number of that route segment. A letter (or name) in this place is the name of the outbound route or destination. Underneath these three letters/numbers there may be numbers which correspond to the switches you need to pull in order to select that route.
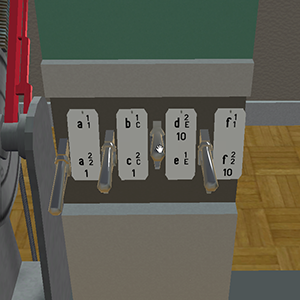 Route Selectors
To operate these, from the initial (middle position) left-click to select the top route, and right-click to select the lower route. once the driver has safely passed, right click from either position to reset it to the starting position. 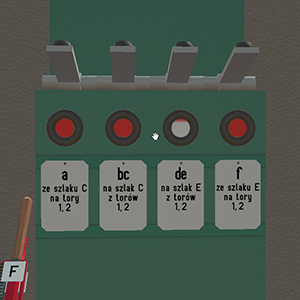 Route Lockers
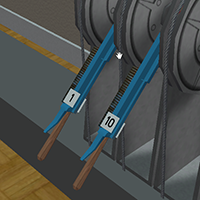
== Route Lockers ==Route Lockers do exactly that. Once you have flipped the switches and selected a route for the train, push the lever about the same route selectors to lock in the route. This will allow you to then flip the Signal Lever to indicate to the driver it is safe to proceed. Left-click to press the lever and raise the white locking indicator. Route Lockers will automatically reset once a train has passed through it’s route segment. To force a reset, left-click and hold for 5 seconds. Note, that the number of route lockers, may not match the number of route selectors, and they might be in different positions.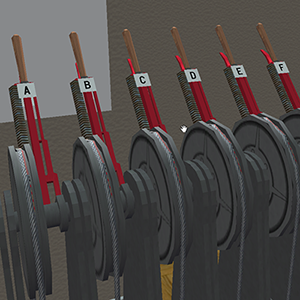 Signal Levers
== Signal Levers ==Use these red levers to flip the signals to tell drivers when it’s safe to proceed along the route. The letters and numbers on the labels correspond with the labels on the route selectors. These remain locked until the switch is flipped, and the route is selected and locked in. Pulling and pushing the Signal Levers is exactly the same as the Switch Levers.- == Station Map ==This will be your best friend until you get to know your station. The game will generate a map of your station, labelling all the signs, signals, switches, tracks and routes for you. Hold the left mouse button to zoom in and pan around.
 Station Map
 - == Chat Box ==The chat box does two things: First, it tells you when drivers have connected to your station, which route they are arriving on, and which route they need to depart on. Secondly, it allows you to communicate with them. Hit the enter key and begin typing. To return to the station, left click anywhere onscreen but the chat box. Use the tilde ‘~’ key to minimise and maximise the chat box (The picture has it maximized).
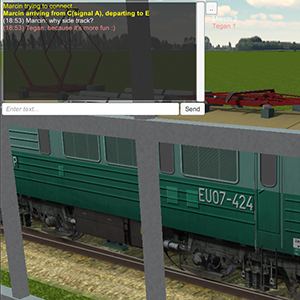 Chat Box


Routing Tutorial 1 – Branching Junction
For this tutorial, we’ll be using a branching Junction. Junctions are the simplest starting point for new Dispatchers. Junctions are not true stations, but are used when a route needs to split off and head to different destinations. This tutorial covers the simplest of these, with three routes, three signals and two switches below, as seen below. We’ve colour-coded the switches and signals according to the colour of their levers.

From Route A to Route B
To get from A to B, trains must pass through switch 1. To route this path:
- branch_01
Select Signal A -> Route B by pulling the lever up 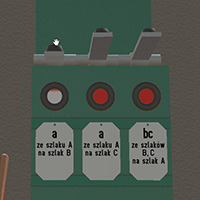
Lock in the route A -> B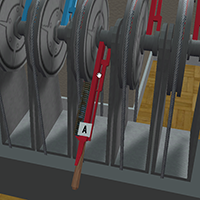
Flip Signal A


Once the train has passed through, reset the signal, then deselect the route. Remember, the lock automatically resets
From Route A to C
To get from A to C, the train must pass through switches 1 and 2. To route this path:
Flip Switch 1 and Switch 2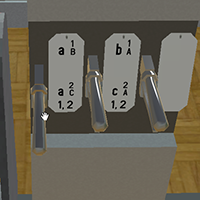
Select Signal A -> Route C by pushing the lever down (right-click)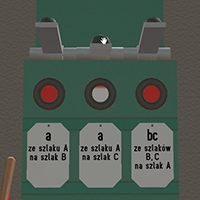
Lock in the Route A -> C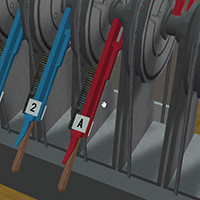
Flip Signal A


Once the train has passed through, reset the signal, deselect the route, and reset the switches
Routing Tutorial 2 – Passing Loop
For this tutorial we’ll be using a Passing Loop. Passing loops are typically used on single-line railways (but can be found in many other places) to allow trains travelling in opposite directions to pass each other. They are connected to the main line by a switch at either end. The tutorial uses a passing loop which has two tracks, two switches, two routes and six signals. Again, we’ve colour-coded the switches and signals according to the colour of their levers.

Route C to Route E via Track 1
To get from C to E via track 1, the train must pass through switches 1 and 10. Routing through this is very similar to the junction tutorial, where the train goes from A -> B. To route this path on the passing loop:
Select the path from Signal A -> Track 1 by pulling this lever up
Select the path from Signal E -> Route E by pushing the lever down. Signal E is at the opposite end of track 1 from Signal A.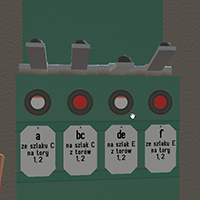
Lock in the path from A -> 1
Lock in the path from E -> F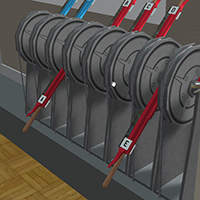
Flip Signals A and E to clear the driver to pass


Once the train has passed through, reset the signals, then deselect the routes. Remember, the locks automatically resets
Route C to Route E via Track 2
To get from C to E via track 2, the train must pass through switch 1 into the passing loop, then rejoin the main line by passing through switch 10. To route through this path:
Flip both switch 1 and 10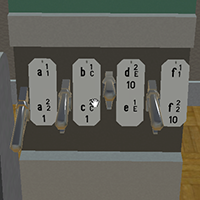
Select the path from Signal A -> Track 2 by pushing the lever down
Select the path from Signal D -> Route E by pulling this lever up. Signal D is at the oppsite end of the loop from Signal A, by switch 10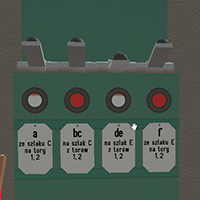
Lock in the path from A -> 2
Lock in the path from D -> F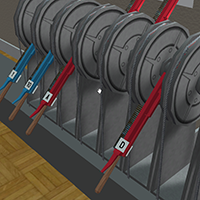
Flip the Signals A and D to clear the train to pass


Once the train has passed through, reset the signals, deselect the routes,and finally the switches