Translations:Zasady zabudowy i obsługi manipulatora PS12 i SSP/5/qqq
WIP
For case presented on pic. 5. there is single track (track no. 1). In even direction we have level crossing distant signal called "118". In opposite direction for operations on track no. 1. there is no distant signal and activating crossing is emerged by giving permitting signal for desired track (in case of reserving track by train before allowing exit signal). This same function is operated on crossings addicted to routes set by SCS, SPE and SPK.
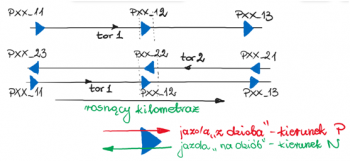
3. Sensors (blue arrows) are placed in true distance from crossing (two pass-thru detectors) and disabling sensor on the crossing. Rules of detectors enumeration and drivind direction (P - even; N - opposite) are detailed here (pic. 6.). 4. Place repeaters in signal box (ERP-5 for older crossings without distant signals or ERP-6 for newer one)
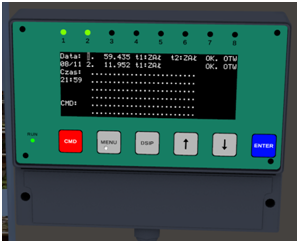
- ERP-6 can display status of up to eight crossings (Pic. 7.). In this case repeater is controlling two crossings (identified as P59435 i P11952)
- ERP-5 (Pic. 8.) we can insert data of only one crossing (in this case it is identified as P56064).
5. Optional crossing addiction in train routes. In this case, you have to select "Route Awakening" checkbox in desired crossing controller. For P11952 crossing (pic. 5.) driving on single track is proceeded with addiction on exit routes (in opposite direction is referencing to blue detectors setup). Select checkbox labeled 1N. 6. For crossing on double track (Pic. 9.) driving to track 1. is proceeded in even direction and to track 2. in opposite direction. So you must select checkbox 1P/2N. Be aware of driving direction for the detector while crossing devices awakening.
Repeater manual
Correctness of all entries in ERP-6 repeater is alerted by proper amount of leds on hed panel of the device. In this case, two crossings (Pic. 10.). Executing of commands is performed by choosing desired crossing by up/down arrows and pressing CMD button to select correct command (Reset, T1wył (first detector off), T1zał (first detector on), T2 wył (second detector off), T2zał (second detector on)). After selecting proper command press ENTER and confirm are you sure by pressing CMD again. After pressing MENU button on the front panel you can display information about state of all controlled crossings (Rys. 11). Actiual time and date, kilometer of every crossing, power state of all detectors (t1:ZAŁ, t2:ZAŁ for double track or only t1:ZAŁ for single one), status of crossing closure (OK. OTW (opened) lub OK. ZAM (closed)) are shown. Włączenie ostrzegania dla danego przejazdu sygnalizowane jest miganiem odpowiedniej diody na panelu czołowym powtarzacza.

